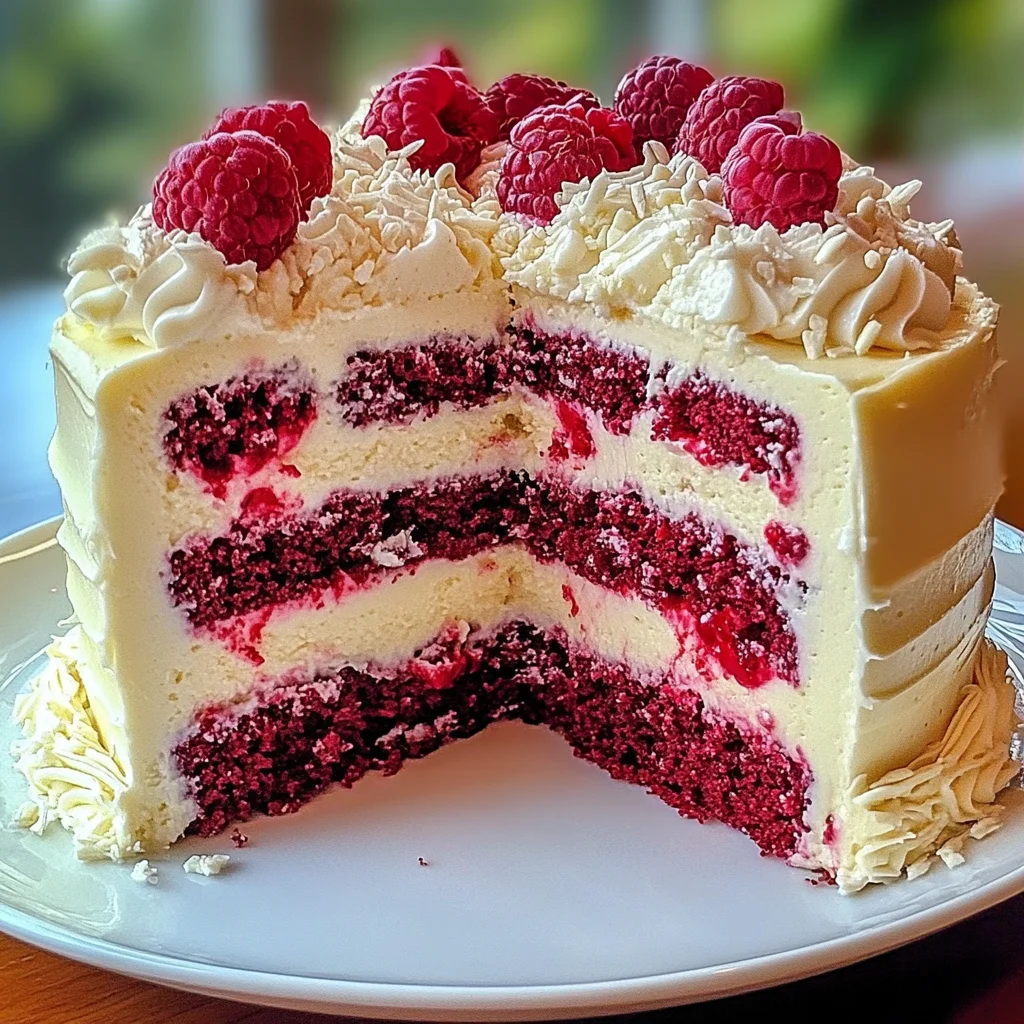
White Chocolate Raspberry Dream Cake – Sweet Easy Recipes Style
If you’re looking for a delightful treat that brings a little sunshine to your day, the White Chocolate Raspberry Dream Cake – Sweet Easy Recipes Style is just what you need. This cake is not only stunning but also incredibly delicious. It has a magical blend of sweet white chocolate and tart raspberries that creates a flavor experience like no other. It’s perfect for any occasion, whether you’re hosting a family gathering, celebrating a birthday, or simply treating yourself after a long week.
I still remember the first time I baked this cake. It was a cozy Sunday brunch with friends, and I wanted something special to impress them. Little did I know, I ended up surprising myself with how easy and rewarding it was! With its light texture and rich flavors, every bite feels like a celebration. So, if you’re in search of sweet easy recipes that bring joy without demanding too much effort, this cake is definitely one to try.
Why You’ll Love This Recipe
- Effortless Preparation: This recipe is straightforward and manageable even for beginner bakers.
- Family-Friendly Delight: Kids and adults alike will adore the combination of flavors—it’s always a hit!
- Make-Ahead Magic: You can bake it in advance; it’s delicious served fresh or after chilling in the refrigerator.
- Beautiful Presentation: The gorgeous layers and garnishes make it perfect for special occasions.
- Versatile Ingredients: You likely have most of the ingredients on hand, making it easy to whip up anytime!

Ingredients You’ll Need
Gathering your ingredients is half the fun! This recipe calls for simple, wholesome components that come together beautifully. Here’s what you’ll need to create your own White Chocolate Raspberry Dream Cake:
For the Cake
- 2 1/2 cups all-purpose flour
- 2 tsp baking powder
- 1/2 tsp baking soda
- 1/2 tsp salt
- 3/4 cup unsalted butter, softened
- 1 3/4 cups granulated sugar
- 4 large eggs
- 1 tsp vanilla extract
- 1 cup buttermilk
- 1/2 cup sour cream
- 1/2 cup white chocolate chips (melted)
- 1 1/2 cups raspberries (fresh or frozen)
For Garnish
- White chocolate shavings
- Fresh raspberries
Variations
One of the best things about this recipe is its flexibility! You can easily adapt it to suit your taste preferences or dietary needs.
- Add citrus zest: A little lemon or lime zest can brighten up the flavors even more.
- Try different berries: Swap out raspberries for strawberries or blueberries for a new twist.
- Make it gluten-free: Substitute all-purpose flour with your favorite gluten-free blend.
- Change the frosting: Use cream cheese frosting instead of buttercream for a tangy contrast.
How to Make White Chocolate Raspberry Dream Cake – Sweet Easy Recipes Style
Step 1: Preheat Your Oven
Start by preheating your oven to 350°F (175°C). This ensures that as soon as you’re ready with your batter, it’s going into an already hot oven for perfect baking.
Step 2: Prepare Your Pans
Grease and line two 9-inch cake pans with parchment paper. This step is crucial because it helps prevent sticking, making it easier to turn out those beautiful cakes later!
Step 3: Mix Dry Ingredients
In a large bowl, whisk together flour, baking powder, baking soda, and salt. This helps combine everything evenly and ensures there are no lumps when you mix in the wet ingredients.
Step 4: Cream Butter and Sugar
In another bowl, cream together the softened butter and granulated sugar until light and fluffy. This step adds air into your batter which helps create that lovely fluffy texture we all crave in cakes!
Step 5: Add Eggs and Vanilla
Add the eggs one at a time to the butter mixture while mixing well after each addition. Then mix in vanilla extract. Each egg provides richness and moisture essential for our dream cake.
Step 6: Incorporate Wet Ingredients
Stir in buttermilk, sour cream, and melted white chocolate until everything is well combined. These creamy ingredients contribute to the cake’s moistness—trust me; it makes all the difference!
Step 7: Combine Dry Ingredients
Gradually add your dry mixture into the wet ingredients. Mix just until incorporated—overmixing can lead to a dense cake which we want to avoid.
Step 8: Fold in Raspberries
Gently fold in those luscious raspberries using a spatula. Don’t worry if they break up slightly; they’ll add beautiful spots of color throughout your cake!
Step 9: Bake Your Cakes
Divide the batter evenly between your prepared pans and bake for about 25–30 minutes or until a toothpick inserted comes out clean. The aroma wafting through your kitchen during this time will be heavenly!
Step 10: Cool It Down
Once baked, cool your cakes in their pans for about 10 minutes before transferring them onto wire racks to cool completely. Cooling prevents sogginess—this is key!
Step 11: Frost & Serve
Frost between layers once cooled completely! Garnish with white chocolate shavings and fresh raspberries on top before slicing into this dreamy creation. Enjoy every bite!
Pro Tips for Making White Chocolate Raspberry Dream Cake – Sweet Easy Recipes Style
Baking this cake is a delightful experience, and with a few pro tips, you can ensure it turns out perfectly every time!
-
Use room temperature ingredients: This includes butter, eggs, and buttermilk. Room temperature ingredients mix together more smoothly, leading to a lighter and fluffier cake.
-
Be gentle with the raspberries: When folding them into the batter, do so gently to avoid breaking them too much. This preserves their shape and ensures you get those lovely bursts of flavor in every bite.
-
Check for doneness carefully: Ovens can vary in temperature. Start checking for doneness a few minutes before the recommended time by inserting a toothpick into the center—if it comes out clean or with a few moist crumbs, it’s ready!
-
Cool completely before frosting: Allowing the cakes to cool completely prevents the frosting from melting off. It’s all about that perfect layer of creamy goodness on top!
-
Experiment with frosting variations: While this cake is delightful as is, feel free to try different frostings like cream cheese or whipped cream for an extra twist. Each option brings its own unique flavor profile!
How to Serve White Chocolate Raspberry Dream Cake – Sweet Easy Recipes Style
Serving your White Chocolate Raspberry Dream Cake can be as fun as making it! With a little creativity, you can make this cake not just delicious but visually stunning too.
Garnishes
- Fresh mint leaves: A couple of fresh mint leaves on top add a pop of color and a refreshing aroma that complements the sweetness of the cake.
- Powdered sugar dusting: A light dusting of powdered sugar creates an elegant finish and enhances the visual appeal without being overly sweet.
- Drizzle of white chocolate: Melt some white chocolate and drizzle it over the top for an added touch of indulgence; it looks beautiful and tastes divine!
Side Dishes
- Mixed green salad: A simple salad with mixed greens, cherry tomatoes, and a light vinaigrette provides a refreshing contrast to the rich cake.
- Vanilla ice cream: The classic pairing! A scoop of vanilla ice cream next to your slice melts beautifully into warm cake bites.
- Fruit salad: A bowl of fresh fruit adds brightness and balance; opt for berries and citrus fruits for complementary flavors.
- Herbal tea: Serve slices alongside cups of herbal tea like chamomile or peppermint for a soothing finish to your meal.
Enjoy creating this unforgettable dessert experience! Whether it’s for brunch or a special occasion, your White Chocolate Raspberry Dream Cake will surely steal the show.
Make Ahead and Storage
This White Chocolate Raspberry Dream Cake is not only a showstopper but also perfect for meal prep! You can easily make it ahead of time and store it, making your life just a bit easier when you’re planning for gatherings or celebrations.
Storing Leftovers
- Allow the cake to cool completely before storing.
- Wrap each layer in plastic wrap or place in an airtight container.
- Store in the refrigerator for up to 3 days.
- For best results, keep the frosting separate until you’re ready to serve.
Freezing
- If you want to freeze the cake, wrap each layer tightly in plastic wrap.
- Place the wrapped layers in a freezer-safe bag or container.
- Freeze for up to 2 months.
- To thaw, transfer to the fridge overnight before serving.
Reheating
- If you prefer your cake warm, preheat your oven to 350°F (175°C).
- Place slices of cake on a baking sheet and cover with foil.
- Heat for about 10-15 minutes until warmed through.
- Serve with fresh raspberries or a drizzle of chocolate sauce for an extra treat!
FAQs
Here are some common questions about this delightful cake:
Can I use frozen raspberries for the White Chocolate Raspberry Dream Cake?
Absolutely! Frozen raspberries work just as well as fresh ones. Just be gentle when folding them into the batter to prevent too much breaking apart.
How do I make the White Chocolate Raspberry Dream Cake more chocolatey?
You can add more melted white chocolate chips into the batter or drizzle some on top after frosting. It enhances that sweet flavor beautifully!
What is the best way to frost the White Chocolate Raspberry Dream Cake?
For a smooth finish, use an offset spatula and apply frosting in thin layers. Let each layer set slightly before adding more frosting for a neat look.
How should I store my White Chocolate Raspberry Dream Cake?
Store it in an airtight container in the fridge for up to 3 days. If you have leftovers, consider freezing them for later enjoyment!
Final Thoughts
This White Chocolate Raspberry Dream Cake truly is a dessert that brings joy with every bite. Its combination of sweet white chocolate and tart raspberries creates a deliciously balanced flavor that everyone will love. I hope you enjoy making this cake as much as I do! Don’t hesitate to share your baking adventures with friends and family—this recipe is sure to impress. Happy baking!
White Chocolate Raspberry Dream Cake

Experience a burst of flavor with the White Chocolate Raspberry Dream Cake! This delightful dessert combines the sweetness of white chocolate with the tartness of fresh raspberries, resulting in a cake that is both visually stunning and irresistibly delicious. Perfect for any occasion—from family gatherings to birthday celebrations—this cake promises to impress without requiring extensive baking skills. With its light texture and rich flavors, each slice feels like a celebration. Whether you’re treating yourself or entertaining guests, this recipe is easy to follow and sure to become a favorite.
- Prep Time: 20 minutes
- Cook Time: 30 minutes
- Total Time: 50 minutes
- Yield: Approximately 10 servings 1x
- Category: Dessert
- Method: Baking
- Cuisine: American
Ingredients
- 2 1/2 cups all-purpose flour
- 2 tsp baking powder
- 1/2 tsp baking soda
- 1/2 tsp salt
- 3/4 cup unsalted butter, softened
- 1 3/4 cups granulated sugar
- 4 large eggs
- 1 tsp vanilla extract
- 1 cup buttermilk
- 1/2 cup sour cream
- 1/2 cup melted white chocolate chips
- 1 1/2 cups raspberries (fresh or frozen)
- White chocolate shavings
- Fresh raspberries
Instructions
- Preheat your oven to 350°F (175°C) and grease two 9-inch cake pans.
- In a bowl, whisk together flour, baking powder, baking soda, and salt.
- Cream together softened butter and granulated sugar until fluffy.
- Add eggs one at a time, mixing well after each addition; then stir in vanilla extract.
- Mix in buttermilk, sour cream, and melted white chocolate until combined.
- Gradually add dry ingredients to wet ingredients until just incorporated.
- Gently fold in raspberries.
- Divide batter between prepared pans and bake for 25-30 minutes or until a toothpick comes out clean.
- Cool cakes in pans for 10 minutes before transferring to wire racks to cool completely.
- Frost as desired and garnish with white chocolate shavings and fresh raspberries before serving.
Nutrition
- Serving Size: 1 slice
- Calories: 340
- Sugar: 28g
- Sodium: 210mg
- Fat: 18g
- Saturated Fat: 11g
- Unsaturated Fat: 6g
- Trans Fat: 0g
- Carbohydrates: 40g
- Fiber: 1g
- Protein: 5g
- Cholesterol: 70mg