Cheesecake Factory Air Fryer Fried Macaroni and Cheese Balls
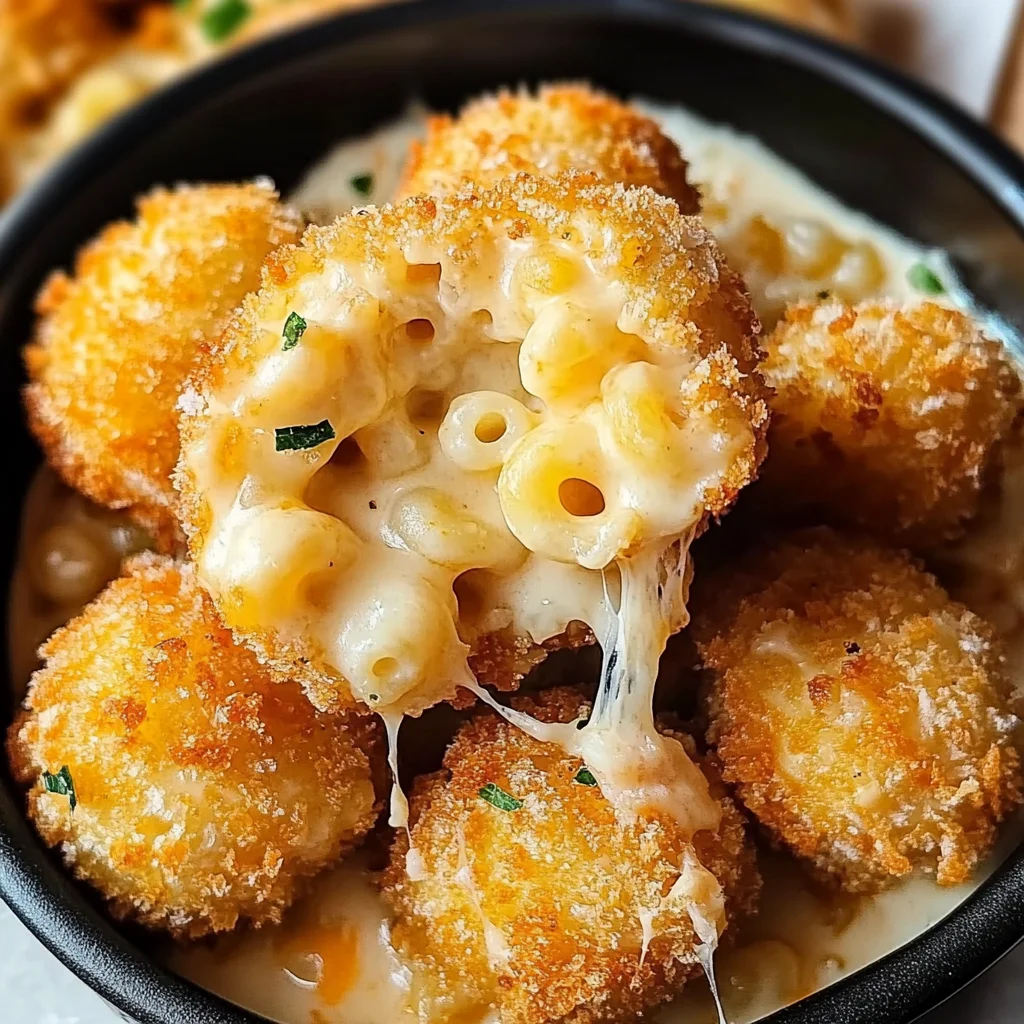
If you’re looking for a delicious appetizer that will have everyone coming back for seconds, you’re in the right place! These Cheesecake Factory Air Fryer Fried Macaroni and Cheese Balls are a true crowd-pleaser. Imagine crispy, golden balls filled with gooey, cheesy goodness—what’s not to love? They’re perfect for busy weeknights when you need something quick yet satisfying or for family gatherings where everyone can enjoy a little comfort food together. Trust me; once you make these, they’ll become a regular request from your loved ones!
Why You’ll Love This Recipe
- Quick and Easy: With just a few simple steps, you can whip up these delightful bites in no time.
- Family-Friendly: Kids and adults alike adore the cheesy flavor and crunchy texture!
- Make-Ahead Convenience: Prep these mac and cheese balls ahead of time and pop them in the air fryer right before serving.
- Versatile Dipping Options: Serve them with your favorite sauces, from marinara to ranch, for a customized experience.
- Healthier Twist: Using the air fryer means less oil while keeping that crispy finish we all crave!

Ingredients You’ll Need
You don’t need anything fancy to make these amazing mac and cheese balls! All the ingredients are wholesome and easy to find. Here’s what you’ll need:
For the Macaroni and Cheese Mixture
- 1 cup elbow macaroni
- 2 tablespoons butter
- 2 tablespoons all-purpose flour
- 1 1/4 cups milk
- 1/2 teaspoon garlic powder
- 1/2 teaspoon onion powder
- 1/2 teaspoon salt
- 1/4 teaspoon black pepper
- 1 1/2 cups shredded mozzarella cheese
- 1/2 cup grated Parmesan cheese
For Breading
- 1 large egg
- 1/2 cup bread crumbs
- 1/2 cup panko bread crumbs
- 1/4 cup all-purpose flour
For Cooking
- Vegetable oil for spraying
Variations
This recipe is so flexible! Feel free to get creative with different flavors and ingredients. Here are some fun variations to consider:
- Add Some Spice: Mix in chopped jalapeños or crushed red pepper flakes for a spicy kick.
- Change the Cheese: Swap out mozzarella for cheddar or gouda for a different flavor profile.
- Incorporate Veggies: Add cooked spinach or roasted red peppers into the macaroni mix for extra nutrition.
- Make it Vegan: Use plant-based milk and cheese alternatives, along with a flax egg instead of the regular egg.
How to Make Cheesecake Factory Air Fryer Fried Macaroni and Cheese Balls
Step 1: Cook the Pasta
Cook the elbow macaroni according to package instructions until al dente. Drain it well and set it aside. This step is crucial because perfectly cooked pasta provides the ideal base for our creamy filling.
Step 2: Prepare the Cheese Sauce
In a medium saucepan over medium heat, melt the butter. Then, whisk in the flour continuously for about 1-2 minutes to create a roux. Slowly pour in the milk while whisking to avoid lumps. Add garlic powder, onion powder, salt, and black pepper. Let this mixture simmer until it thickens slightly—this helps develop rich flavors.
Step 3: Melt the Cheeses
Stir in both shredded mozzarella cheese and grated Parmesan cheese until melted and smooth. This is where all that cheesy goodness comes together! Once melted, remove from heat.
Step 4: Combine Pasta with Cheese Sauce
Add your cooked macaroni to this lovely cheese sauce and stir well to coat every piece of pasta evenly. Allow this mixture to cool down; this makes it easier to form into balls later on.
Step 5: Forming the Balls
Once cooled (about 15-20 minutes), scoop small portions of the macaroni mixture and roll them into ball shapes using your hands. Place these on a parchment-lined baking sheet so they don’t stick together.
Step 6: Bread the Balls
In one shallow dish, beat your egg until fully mixed. In another dish, combine bread crumbs and panko bread crumbs. Roll each macaroni ball first in the egg mixture, then coat it well with breadcrumbs. This double layer ensures maximum crunch!
Step 7: Prepare for Air Frying
Place your breaded macaroni balls back onto the parchment-lined sheet. Give each ball a light spray of vegetable oil—this helps achieve that golden color while cooking.
Step 8: Air Frying Time!
Preheat your air fryer to 375°F (190°C). Arrange those beautiful balls in a single layer in the basket without touching each other. Cook them for about 8-10 minutes, flipping halfway through so they brown evenly on all sides.
Step 9: Serve & Enjoy!
Once golden brown and crispy on the outside, carefully remove them from the air fryer. Allow them to cool slightly before serving them with your favorite dipping sauce. Enjoy every cheesy bite!
Pro Tips for Making Cheesecake Factory Air Fryer Fried Macaroni and Cheese Balls
These tips will help you create the crispiest, most delicious macaroni and cheese balls that are sure to impress!
-
Use cold macaroni mixture: Allowing the macaroni and cheese to cool completely before forming balls ensures they hold their shape during frying. This helps prevent them from falling apart, giving you a perfect bite every time.
-
Don’t overcrowd the air fryer: Cooking in batches allows for even cooking and browning. Each ball should have enough space for hot air to circulate around it, leading to that crispy exterior we all love.
-
Experiment with cheeses: While this recipe calls for mozzarella and Parmesan, feel free to mix in your favorite cheeses! Cheddar or pepper jack can add a fun twist, enhancing flavor and creaminess.
-
Double breading for extra crunch: For an even crunchier texture, dip the balls in egg and breadcrumbs twice. This creates a thicker coating that crisps up beautifully in the air fryer.
-
Adjust cooking time based on size: If your macaroni balls are larger or smaller than specified, adjust your cooking time accordingly. Keeping an eye on them will ensure they reach that perfect golden-brown color without burning.
How to Serve Cheesecake Factory Air Fryer Fried Macaroni and Cheese Balls
Presentation is key when serving these delightful bites! Here are some ideas to make your dish stand out at any gathering.
Garnishes
- Chopped fresh herbs: A sprinkle of parsley or chives adds a pop of color and freshness that brightens up the dish.
- Grated Parmesan: A light dusting of grated Parmesan on top right before serving enhances the cheesy goodness.
- Spicy aioli or marinara sauce: Drizzling a flavorful sauce on top not only looks beautiful but also adds an extra layer of taste.
Side Dishes
- Garden Salad: A crisp salad with mixed greens, cherry tomatoes, and a light vinaigrette provides a refreshing contrast to the rich flavors of the mac and cheese balls.
- Roasted Vegetables: Seasonal roasted vegetables add depth to your meal. They’re not only healthy but their slight sweetness pairs well with cheesy dishes.
- Garlic Bread: Crunchy garlic bread is always a crowd-pleaser. It complements the creamy mac and cheese bites wonderfully while adding an additional layer of texture.
- Sweet Potato Fries: The natural sweetness and crispy texture of sweet potato fries create a delicious balance with the savory mac and cheese balls.
Enjoy your culinary adventure with these Cheesecake Factory Air Fryer Fried Macaroni and Cheese Balls! They are perfect for any occasion, whether it’s game day, a family gathering, or just a cozy night in. Happy cooking!
Make Ahead and Storage
These Cheesecake Factory Air Fryer Fried Macaroni and Cheese Balls are not only delicious but also perfect for meal prep! You can make a big batch ahead of time and enjoy them throughout the week.
Storing Leftovers
- Place leftover macaroni balls in an airtight container.
- Store them in the refrigerator for up to 3 days.
- Reheat in the air fryer for best results, allowing them to regain their crispiness.
Freezing
- Allow the macaroni and cheese balls to cool completely before freezing.
- Arrange them in a single layer on a baking sheet and freeze until solid.
- Transfer the frozen balls to a freezer-safe bag or container, where they can last up to 3 months.
Reheating
- Preheat your air fryer to 375°F (190°C).
- Place the frozen macaroni and cheese balls directly in the air fryer basket.
- Cook for about 10-12 minutes or until heated through and crispy on the outside.
FAQs
Got questions? Don’t worry, I’m here to help!
Can I use other types of cheese for these Cheesecake Factory Air Fryer Fried Macaroni and Cheese Balls?
Absolutely! Feel free to experiment with different cheeses like cheddar or gouda for a unique twist on flavor. Just make sure they melt well.
How do I make Cheesecake Factory Air Fryer Fried Macaroni and Cheese Balls without eggs?
You can substitute the egg with a flaxseed egg (1 tablespoon ground flaxseed mixed with 2.5 tablespoons water) or use a store-bought egg replacer for binding.
What dipping sauces pair well with these macaroni and cheese balls?
These cheesy bites are fantastic with marinara sauce, ranch dressing, or even a spicy aioli. Choose your favorite for an extra kick!
Final Thoughts
I hope you have as much fun making these Cheesecake Factory Air Fryer Fried Macaroni and Cheese Balls as I did! They’re perfect for sharing with friends or enjoying as a cozy snack at home. Remember, cooking is all about experimenting and making it your own, so don’t hesitate to add your personal touch. Enjoy every cheesy bite, and happy cooking!
Cheesecake Factory Air Fryer Fried Macaroni and Cheese Balls
Indulge in the crispy, cheesy delight of Cheesecake Factory Air Fryer Fried Macaroni and Cheese Balls! These golden bites are filled with a gooey macaroni and cheese mixture and air-fried to perfection, creating a satisfying crunch with every bite. Perfect as a quick appetizer for family gatherings or as a cozy snack for movie nights, they are sure to be a hit among kids and adults alike. Plus, they offer a healthier twist by using the air fryer instead of deep frying. Serve them with your favorite dipping sauces for an extra layer of flavor. Get ready to impress your guests with these crowd-pleasing treats that are easy to make!
- Prep Time: 20 minutes
- Cook Time: 10 minutes
- Total Time: 30 minutes
- Yield: About 12 servings 1x
- Category: Appetizer
- Method: Frying
- Cuisine: American
Ingredients
- 1 cup elbow macaroni
- 2 tablespoons butter
- 2 tablespoons all-purpose flour
- 1 1/4 cups milk
- 1/2 teaspoon garlic powder
- 1/2 teaspoon onion powder
- 1/2 teaspoon salt
- 1/4 teaspoon black pepper
- 1 1/2 cups shredded mozzarella cheese
- 1/2 cup grated Parmesan cheese
- 1 large egg (or flaxseed egg for vegan)
- 1/2 cup bread crumbs
- 1/2 cup panko bread crumbs
- Vegetable oil for spraying
Instructions
- Cook the elbow macaroni according to package instructions until al dente. Drain and set aside.
- In a saucepan, melt the butter over medium heat, then whisk in the flour for about 2 minutes to form a roux.
- Gradually add the milk while whisking to avoid lumps, then incorporate garlic powder, onion powder, salt, and black pepper. Let simmer until thickened.
- Remove from heat and stir in mozzarella and Parmesan cheese until melted.
- Combine cooked macaroni with the cheese sauce and allow it to cool.
- Once cooled, shape the mixture into balls and place on a parchment-lined sheet.
- Prepare the egg wash (or flaxseed mixture) in one dish and mix breadcrumbs in another.
- Dip each ball in the egg wash, then roll in breadcrumbs for coating.
- Lightly spray each ball with vegetable oil and preheat air fryer to 375°F (190°C).
- Air fry in batches for about 8-10 minutes or until golden brown.
Nutrition
- Serving Size: 1 serving
- Calories: 110
- Sugar: 1g
- Sodium: 220mg
- Fat: 6g
- Saturated Fat: 3g
- Unsaturated Fat: 3g
- Trans Fat: 0g
- Carbohydrates: 9g
- Fiber: 0g
- Protein: 5g
- Cholesterol: 30mg


